- Awards Tool
- Copying Content
- Syncing Gmail Calendar with eConestoga
- Syncing iCal with eConestoga
- Syncing Office365 Calendar with eConestoga
- eConestoga Community Shells
- Request Custom Shells
- End Dates & Controlling Course Visibility
- Enrollment & User Roles
- Keeping Your ePortfolio After You Graduate
- Grades Setup
- Merging Courses
- Publishing Your Grades
- Quiz Submission Views
- eConestoga Student Reference
- Special Access in eConestoga Quizzes
Our Guides Have Moved!
If you have bookmarks to our old guide site, please update them!
You can find this guide in its new location here:
Create a Rubric
Create a Rubric
Online rubrics can greatly speed up grading of student assignments by allowing you to simply click on a box representing a student's level of achievement in each key evaluation criterion.
To create a new Rubric in your course:
- Go to Course Tools > Rubrics.
- Click New Rubric at the top of the screen.
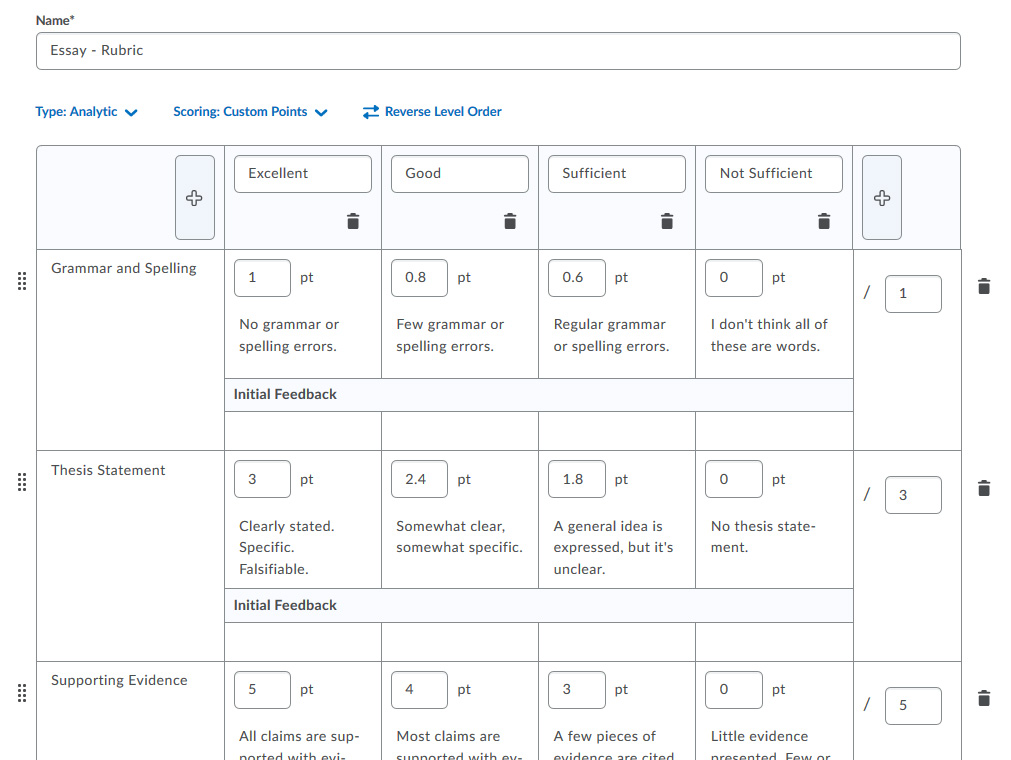
- Give the rubric a Name. In the row of options below the Name field, set the Scoring option to Custom Points.
- A large grid will break your rubric down into Criteria on the left, and Levels of achievement along the top. Start by editing the names of the Level. Instead of the generic titles "Level 1", "Level 2", and so on, give your Levels informative names like "Excellent", "Good", "Sufficient", "Not Sufficient", etc. You can add additional criteria by clicking the plus icon to the right of the top row, or remove an unneeded level by clicking the trash can icon under its name.
- Next, enter a name for each Criterion you will be assessing.
- With the criteria and levels set up, you can begin filling in the grid. For each space in the grid, enter the number of Points that a student would usually score for landing in that space. Underneath that, type a description of the type of work that would land a student in that space.
- Optionally, you can enter Initial Feedback for each box. While the text in the main area of each space will be visible to all students before they submit their assignment, text in the Initial Feedback boxes will only appear to students after their assignment is submitted and graded, and only if you chose that specific space on the rubric as their score for that criterion.
- At the bottom of the rubric, set levels of achievement under the Overall Score, and the minimum score that would typically place a student into that level. A good shorthand method of determining these point values: the minimum value to fall into the best Overall Score box is the total of all of the spaces in the next-best column, plus 1.
- When you're finished, click Close at the bottom.

Once you've created your Rubric, you will need to connect it to an Assignment Folder before it can be used to grade students.
Tips for Good Rubrics
- The descriptions typed into each square of the rubric should be detailed enough to be useful to the student. In each square, type in some qualities that would be typical of a student who scored that level of achievement in that criterion. For example, if one of your criteria is for Supporting Evidence, what are the qualities of "Excellent" supporting evidence? What about "Sufficient" supporting evidence? Try to provide enough information in each box so that any student who is graded in that space understands what they did correctly and incorrectly, and thus how they might improve the next time.
- When laying out the Levels of your rubric, remember that there is little benefit in having more than one Fail category. In other words, if a criterion is worth 10 points, the Levels should not evenly divide the 10 points (10pts for Excellent, then 8pts for Good, 6pts for Okay, 4pts for Sufficient, and 2pts for Insufficient). Instead, the lowest Level should be for a failure (and the text description should include information about what type of work will make a student fail that criterion), and then the next Level up should be for a bare pass - so if your program's passing grade is 60%, the second-worst Level should correspond to a mark of 60% in that Criterion. After that, your remaining levels can increase at an even rate up to a perfect grade in the highest Level.