- Awards Tool
- Copying Content
- Syncing Gmail Calendar with eConestoga
- Syncing iCal with eConestoga
- Syncing Office365 Calendar with eConestoga
- eConestoga Community Shells
- Request Custom Shells
- End Dates & Controlling Course Visibility
- Enrollment & User Roles
- Keeping Your ePortfolio After You Graduate
- Grades Setup
- Merging Courses
- Publishing Your Grades
- Quiz Submission Views
- eConestoga Student Reference
- Special Access in eConestoga Quizzes
Our Guides Have Moved!
If you have bookmarks to our old guide site, please update them!
You can find this guide in its new location here:
Request Custom Shells
Request Custom Shells
What are custom shells?
Conestoga faculty have the ability to request any number of blank course shells, called "custom shells", for experimentation and course development. A custom shell works like a normal course shell-- containing content, assessments, grades, and so on-- but is not tied to a specific delivery of a course, and will not have any students enrolled in it.
Note: This tool is no longer used to create Model shells. Models are now created centrally by your department. Details can be found here:
Request a Custom Shell
Faculty can create a custom shell through the Employee Portal:
- Log in to the Employee Portal and click on the Faculty tab.
- Click Request Custom Shell.
- Choose which type of Custom Shell you wish to make.
- Choose Course-Related Shell if the shell you are setting up will have content related to a specific course.
- Choose Custom Shell if the shell you are creating is a sandbox or houses general resources not related to one particular course.
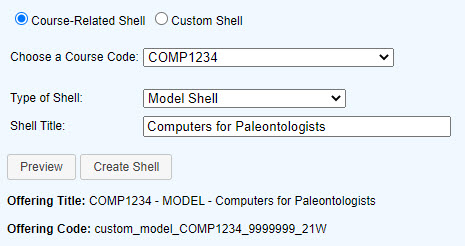
- If you selected Custom Shell, you only need to type in the title you wish to appear on the course shell. If you chose Course-Related Shell, you will need to specify some additional information:
- Choose a Course Code from among the courses you have been attached to teach in the past, present, or future.
- Under Type of Shell, select whichever is appropriate:
- A Temporary Development Shell is used by one instructor to edit content for a specific upcoming semester, most commonly before the actual live shells for that semester are available.
- A Faculty Working Group is an area for instructors of the same course to share resources that would not be uploaded into a live course, such as answer keys, scheduling documents, or curriculum documents.
- The Shell Title will be pre-filled with the official short title for the selected course code, but you can edit it to any other title you prefer.
- Once you're satisfied with the settings you've entered, click Preview. The system will display the visible Offering Title and hidden Offering Code for your new shell. You can still change any of the entered values at this point, and then click Preview again to update the displayed title and code.
- Once you're satisfied with the displayed title and code, click Create Shell. The course shell will be created immediately in eConestoga and added to your course list under the Permanent Shells tab.
Notes:
- You will be the only Instructor enrolled in your new Custom Shell by default. If you chose the Course-Related Shell option, your Chair will also be added automatically to the shell. To enroll other faculty, please refer to the instructions in the Guide to Enrollments & User Roles.
- Students will not see your Custom Shells. If you wish to create a shell that both faculty and students will access, you should instead request a Community Shell. A community shell can be set up to automatically enroll students in a certain program or school, or we can grant you the ability to manage enrollments manually.