- Awards Tool
- Copying Content
- Syncing Gmail Calendar with eConestoga
- Syncing iCal with eConestoga
- Syncing Office365 Calendar with eConestoga
- eConestoga Community Shells
- Request Custom Shells
- End Dates & Controlling Course Visibility
- Enrollment & User Roles
- Keeping Your ePortfolio After You Graduate
- Grades Setup
- Merging Courses
- Publishing Your Grades
- Quiz Submission Views
- eConestoga Student Reference
- Special Access in eConestoga Quizzes
Our Guides Have Moved!
If you have bookmarks to our old guide site, please update them!
You can find this guide in its new location here:
Grades Setup
Grades Setup
This guide will walk you through the steps necessary to create a simple Grades setup within eConestoga. This guide will not cover some of the more complicated and less-used parts of the Grades system, but feel free to explore the additional features of the Grades tool if you are comfortable doing so!
Step 1: Pencil and Paper
It’s important to first have a clear idea of what the grade structure for your particular course looks like. In most cases, this information will be listed on the last page of your course outline, likely in a format similar to this:
| Exams (2 x 20%) | 40.00 |
| Team Research Presentation | 30.00 |
| Assignments | 20.00 |
| Reflection Paper | 10.00 |
| 100.00% |
It’s very important that your Grades structure in eConestoga follow the mark breakdown in your Outline. However, you’ll notice that most outlines (including the example above) can be a bit vague—for example, the above outline lists “Assignments – 20%”, but leaves the specific number of assignments and their relative values up to the instructor.
Before setting anything up in eConestoga, write out a detailed list of every assignment that will be delivered in your course. For each one, note how many points each one will be graded out of (e.g., “Quiz 2 – 27pts”; “Quiz 3 – 32pts”), and each item’s overall value in the course (e.g., “Quiz 2 – 3% of final”; “Midterm – 30% of final”).
It’s likely that your list will take one of two forms:
1A – Grades setup with specific assignments
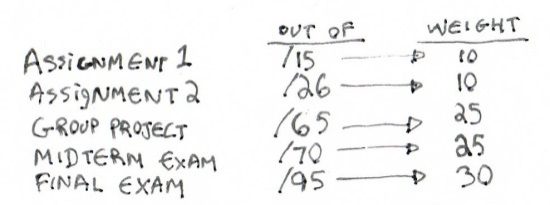
In the simplest type of gradebook, which tends to involve a smaller number of assignments overall, all of the gradable items are known ahead of time and each has a discrete value—e.g., “Assignment #2 is 10% of the course”.
1B – Grades setup with groupings
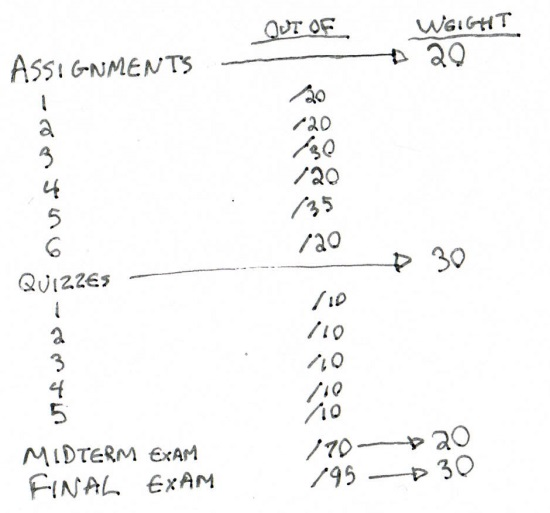
The other type of gradebook, which tends to involve a larger number of assignments, has bundles of gradable items that collect to make up a known percentage—e.g., “There are twelve quizzes, and together they make up 30% of the final grade”.
Once you have completed your outline of your gradebook’s structure, you can start building it within eConestoga.
Step 2: The Grades tool
To begin, go into your course and click Course Tools -> Grades and then choose the “Manage Grades” tab at the top of the screen.
2A – Settings
First, let’s confirm that some basic settings are in place. Click Settings at the top right of the screen, then choose the Calculation Options tab. There are five main settings to check, most or all of which should already be set by default:
- Grading System: Weighted
- Final Grade Released: Calculated Final Grade
- Automatically Release Final Grades: checked
- Grade Calculations: Treat ungraded items as 0
- Auto Update: checked
2B – Items and Categories
Grade setups in eConestoga are built from two main components:
- Items are the main component of the Grades tool, each corresponding to a graded assessment in your course. Each Item is worth a certain amount toward the final grade, and each student will receive a grade on each Item.
- Categories are an optional component that is not used in all Grades setups. Categories can be used to group a number of Items together to form a composite mark-- for example, seven quizzes that together make up 30% of the final grade. For the purposes of this guide, Categories will only be used if your breakdown in Step 1 resulted in a Grades setup with Groupings.
Building Items
Let’s go ahead and set up your Grades by building Items.
- Click the blue “New” button at the top left of the Manage Grades screen and choose “Item”.
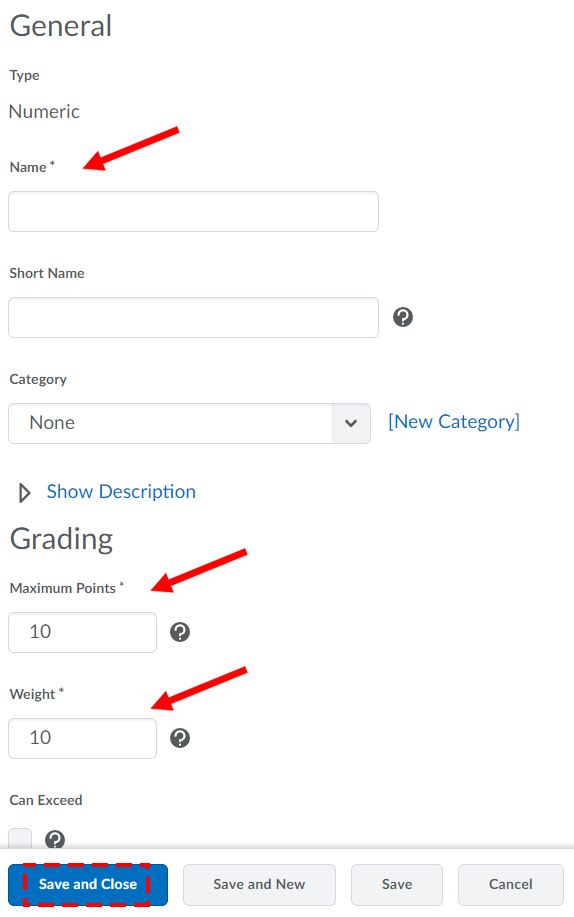
- Create a Numeric item.
- The settings screen for an Item contains dozens of options, but only three are necessary in our case:
- Name: The name of the assignment. For example, “Quiz 3” or “Final Report”.
- Maximum Points: The score that the assignment will be graded out of.
- Weight: The percentage value that the assignment has toward the final grade. For example, a short discussion activity might have a Weight of only 1 or 2, while a final exam might have a Weight of 40 or more.
- All other options can be ignored for now. When finished, click “Save and New” at the bottom of the screen.
- Repeat 2-4 until all of the Items in your grades setup are built.
If your gradebook setup in Step 1 earlier was a Grades Setup with Specific Assignments, you should now be finished.
Building Categories
If your Grades Setup included Groupings, you will now need to build some Categories. To do this:
- Click the blue “New” button at the top left of the Manage Grades screen and choose “Category”.
- As with Items, there are only three settings that we need to configure for a Category:
- Name: The name of the category. For example, “Quizzes”.
- Weight: The percentage value that the category as a whole will contribute toward the final grade. So if you are creating a Quizzes category that contains 5 Quizzes that are each worth 5% of the final grade, the Weight of your Quizzes category would be worth 25%.
- Distribution: How the contents of the category will be weighted against each other. For our purposes today, choose the second or third option, depending on your need:
-
- Distribute weight by points: Used if the items in a Category are not evenly weighted. E.g., if you have three short Quizzes worth 5% each and two longer quizzes worth 8%.
- Distribute weight evenly: Used if the items in your Category are all worth the same percentage of the final grade.
- Click Save and Close if you have only one Category to build, or Save and New if you wish to build more.
Once you have built your Categories, you will need to categorize your assignments within them.
- On the Manage Grades screen, check the boxes to the left of all of the items you wish to place in Categories, and then click “Bulk Edit” above the list.
- You will be taken to the “Edit Items and Categories” screen. The far right column is called “Category”, and all items should currently say “None”. Change this drop-down field to the title of whichever Category you wish to place each item into. For example, Quiz 1, Quiz 2, Quiz 3, etc., would go under “Quizzes”.
- When finished, click “Save” at the bottom.
2C - Fixing Math Errors
If you have done everything correctly, you will not see any “Notes” above your list of Items and Categories. Here is an example of what those Notes look like when they do occur:

If you see a message like this, there are two main things to check:
- Weighting: The total of all Categories and all uncategorized Items in your course must add up to 100 Weight. Items within Categories are ignored for this total. Go over your Items and Categories and confirm that they do in fact add up to exactly 100; if they do not, you will need to edit the contents of your Grades (increasing or decreasing the Weight of one or more items or categories) until this total is reached.
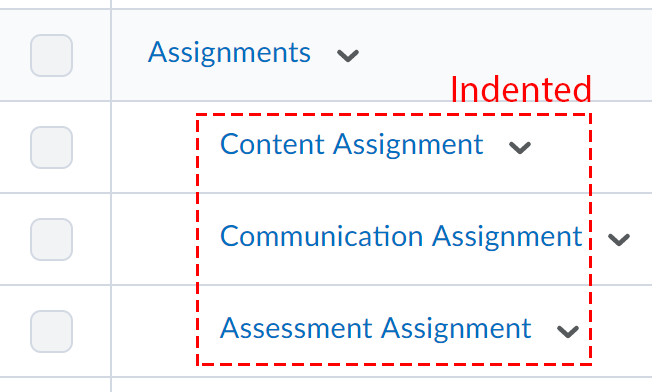
- Categorization: Ensure that all items you intended to be inside Categories actually are inside their Categories. When you look at the Manage Grades screen, Items that are contained inside their Category are indented on the left, like so:
- Click on that Item’s title
- Find the “Category” dropdown (which will currently say “none”) and change it to the desired Category
- Click “Save” at the bottom
If one or more of your Items are not inside of a Category as intended:
Step 3: Linking Assessments to the Grades tool

If you are using eConestoga to deliver online Quizzes and Assignments, you can connect those assessment objects to specific Grade Items. If you do, grades you enter on those Quizzes and Assignments will be automatically transferred to the Grades tool.
To connect an Assignment Submission Folder:
- Go to Course Tools -> Assignments.
- Click the down arrow beside a Submission folder’s title and choose “Edit Submission Folder”.
- Click the Grade Item drop-down field and choose the Item in your grades setup that you wish to connect to.
- Scroll down and click “Save and Close”.

To connect a Quiz:
- Go to Course Tools -> Quizzes.
- Click the down arrow beside a Quiz’ title and choose “Edit”.
- Go to the Assessment tab.
- Click the Grade Item drop-down field and choose the Item in your grades setup that you wish to connect to.
- Check the box under Auto Export to Grades.
- If it is not already set, check the box under Automatic Grade (though this should be set by default).
- Scroll down and click “Save and Close”.
Note: You should ideally connect your Quizzes and Assignments to your Grade Items before students have completed them, to ensure that their grades are visible to them as soon as the assessments have been marked.
Step 4: Entering Grades
Any Grade Items that will not be receiving marks from a linked Assignment will need to have marks entered manually. To enter grades:
- Go to Course Tools -> Grades.
- Click the “Enter Grades” tab near the top.
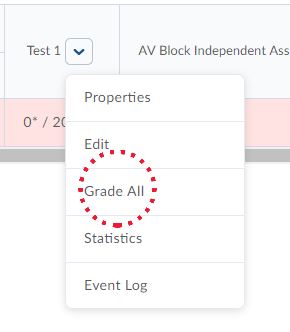
- You should see all of your students listed on the left side of the screen, and all of the Items and Categories you set up along the top. Click the drop-down arrow beside the Item you wish to grade and choose “Grade All”.
- Enter a Grade in the type-in field beside each student.
- If you wish to enter text feedback, click the speech bubble icon in the “Feedback” column, type your comments, then click Save.
- When you have entered all the Grades and Feedback that you wish to add, click Save at the bottom.
If you have any trouble setting up your Grades, please do not hesitate to contact eConestoga Support at eConestoga@conestogac.on.ca.