- Awards Tool
- Copying Content
- Syncing Gmail Calendar with eConestoga
- Syncing iCal with eConestoga
- Syncing Office365 Calendar with eConestoga
- eConestoga Community Shells
- Request Custom Shells
- End Dates & Controlling Course Visibility
- Enrollment & User Roles
- Keeping Your ePortfolio After You Graduate
- Grades Setup
- Merging Courses
- Publishing Your Grades
- Quiz Submission Views
- eConestoga Student Reference
- Special Access in eConestoga Quizzes
Our Guides Have Moved!
If you have bookmarks to our old guide site, please update them!
You can find this guide in its new location here:
Publishing Your Grades
Publishing Your Grades
At the end of each semester, instructors must ensure that students can see their final grades, and submit their final eConestoga grades to the Chair for approval.
Release final grades to your students 
Depending on the settings in your eConestoga grades, students may or may not be able to see their Final Grade.
- From your course, click Course Tools -> Grades -> Enter Grades.
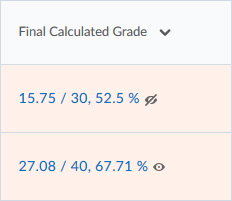
- Scroll to the right and locate the two Final Grade columns (Final Calculated Grade and Final Adjusted Grade). A small eye icon is displayed beside one of the two Final Grade columns, and you should note two things about this icon:
- Is the icon located beside the Final Calculated Grade or the Final Adjusted Grade? If the icon is beside the wrong column, you will need to change your Grades settings to release the correct final grade column:
- Click Settings at the top right of the Enter Grades screen.
- On the next screen, open the Calculation Options tab.
- Scroll down and locate a setting titled Final Grade Released. Select whichever grade column you wish to be used in your course, then click Save at the bottom.
- When you're finished, click Close.
- Is the icon an open eye or a crossed-out eye? An open eye indicates that your students can see that final grade column; a crossed-out eye indicates that they cannot. If the eye is crossed out:
- Click the drop-down arrow beside the final grade column you are using and choose Enter Grades.
- On the next screen, click the drop-down arrow beside the "Final Grades" page header and choose Release All.
- Confirm the prompt that appears, then click Close.
Note that you can release your final grades to students at any point in the semester. You do not need to wait until the end of the semester when your students’ grades are complete. If you release the grade mid-semester, your students will see a “mark to date” based on assignments they have completed.
Submit final grades to your
At the end of the semester, once your grades within eConestoga are finalized, you must submit those grades to your Chair for approval. A tool is provided through the Employee Portal to import and submit your eConestoga grades.
- Log into the Employee Portal and open the Faculty tab.
- Click eConestoga Grades Import.
- From the Select a Session drop-down menu, choose the current semester, and a table listing each of your course sections for the current semester should appear.
- Choose one of the listed course sections and click the Import Grades link to the right of it.
- There will be a short delay, after which the system should display a list of students in your course and their current final grade pulled from eConestoga (automatically rounded to the nearest whole number). Note that the grades displayed on this screen are contained within type-in fields-- if you wish to make any adjustments to any student's grade (e.g., to round up where the system automatically rounded down), you may do so now.
- Ensure that all grades are correct, make final changes if needed, and then click Submit to send your grades to your Chair for approval.
- Notes:
- You cannot import grades from a merged eConestoga course. If your course sections were merged, you must use the separate "Grade Entry" tool under the Faculty tab of the Employee Portal and type your students' grades in manually.
- If you receive an error after clicking Import Grades, or if you import your grades and grades from the incorrect final grade column are brought over, then it is likely that you have the wrong grade column selected in eConestoga. Use the instructions in the first section of this guide to change which final column is released in your course, then attempt the grades import again.
- There is a fixed window of time for Chair approval of grades, beginning on your course’s end date and closing approximately two weeks later. To see the submission window for your course, hover your mouse over the course code in the first column of the Import Grades table. If you missed the submission window, click Request Extension in the last column of the table and follow the prompts to request that your Chair extend it.