- Awards Tool
- Copying Content
- Syncing Gmail Calendar with eConestoga
- Syncing iCal with eConestoga
- Syncing Office365 Calendar with eConestoga
- eConestoga Community Shells
- Request Custom Shells
- End Dates & Controlling Course Visibility
- Enrollment & User Roles
- Keeping Your ePortfolio After You Graduate
- Grades Setup
- Merging Courses
- Publishing Your Grades
- Quiz Submission Views
- eConestoga Student Reference
- Special Access in eConestoga Quizzes
Our Guides Have Moved!
If you have bookmarks to our old guide site, please update them!
You can find this guide in its new location here:
Special Access to Assessments
Special Access to Assessments
If you use Quizzes and Assignments in your eConestoga course, you may find that some of your students require accessibility accommodations in order to complete them. Some of your students may need additional writing time, while others may need to access your quiz or submission folder at a different date and time in order to write in the Accessibility Testing Center. You can set these and other options using the “Special Access” feature in eConestoga Quizzes and Assignments.
Quiz Special Access
- Go to Course Tools -> Quizzes.
- Click the drop-down arrow beside the title of the Quiz and choose Edit.
- Open the Restrictions tab at the top of the screen.
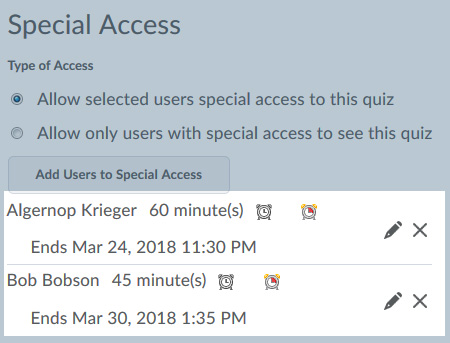
- Scroll to the bottom of the screen to the “Special Access” heading. Ensure that the first option (“Allow selected users special access to this quiz”) is selected, then click “Add Users to Special Access”.
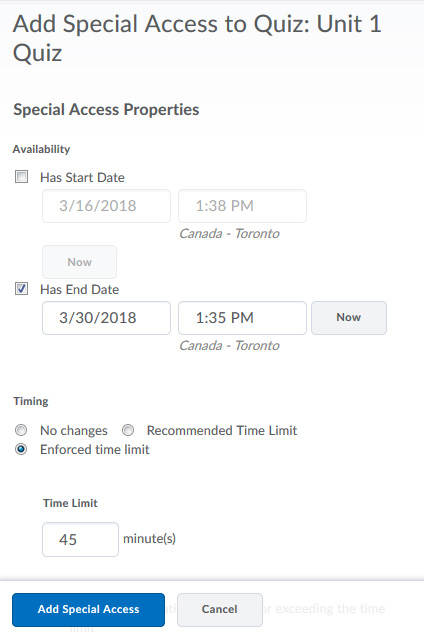
- Special Access is configured in two main steps. First, choose what will be different for the selected student(s).
- Date: If the student(s) will write on a different day or time, check the “Start Date” and “End Date” boxes and specify their custom date range. Note that extending the Start Date and End Date will not give individual students more time to write their attempt; instead, it only expands the range of time in which they are able to start the quiz.
- Writing Time: If the user will have more writing time, select the option under “Timing” labeled “Enforced Time Limit”, then type the number of minutes the selected student(s) will have to write the quiz.
- Attempts: If the student(s) will have additional Attempts, check the box labeled “Override attempts allowed” and then set the number of Attempts that they will have.
- Respondus LockDown Browser: If your quiz has been set to use Respondus LockDown Browser as an anti-cheating measure, please note that Respondus will interfere with some accessibility software that your students may use. If any of your students require special software to write tests, you can remove the requirement for those students to use Respondus by checking “LockDown Browser – Not required to take this quiz”. This exemption will only impact the specific student for whom you are configuring special access.
- Next, choose which student(s) these overrides will apply to by checking the box beside each name. You can choose one name or multiples at the same time, depending on whether multiple students need the same accommodations.
- When you are finished, click “Add Special Access” at the bottom.
- You will then be returned to the Restrictions tab of your Quiz' settings, where you can see a summary of which students have Special Access and what is different for each one:
Assignment Special Access
- Go to Course Tools -> Assignments.
- Click the drop-down arrow beside the title of the Assignment Folder and choose Edit Assignment.
- Open the Availability Dates & Conditions block on the right.
- Click Manage Special Access.
- Ensure that the first option (“Allow users with special access to submit outside the normal availability dates for this folder”) is selected, then click “Add Users to Special Access”.
- Special Access is configured in two main steps. First, choose what will be different for the selected student(s).
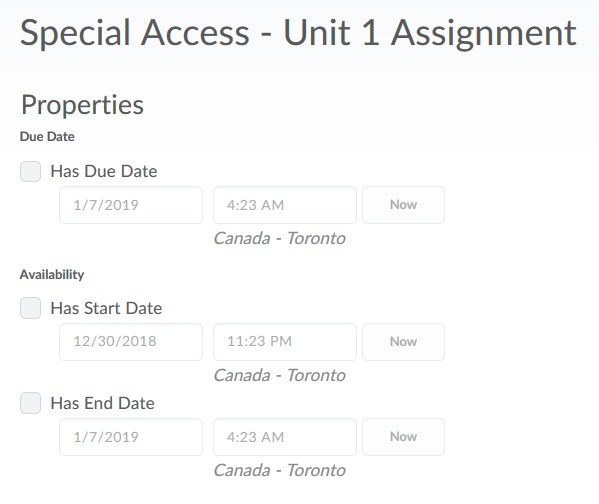
- Start Date and End Date: If the student(s) will write on a different day or time, check the “Start Date” and “End Date” boxes and specify their custom date range.
- Due Date: Remember that Due Dates in eConestoga quizzes are non-binding, and only function as the "expected submission date" for the assignment. However, if you do typically set both a Due Date and an End Date, updating the Due Date will ensure that the correct date is displayed to the student on the Assignments screen.
- Next, choose which student(s) these overrides will apply to by checking the box beside each name. You can choose one name or multiples at the same time, depending on whether multiple students need the same accommodations.
- When you are finished, click “Save” at the bottom.
- You will then be returned to the Restrictions tab of your Assignment's settings, where you can see a summary of which students have Special Access and what is different for each one:
Important Note: There is currently a bug that may cause your Date settings not to be saved when you initially set up Special Access for a student. After creating new Special Access for a student, scroll back to the bottom of the Restrictions tab and check the Special Access summary to ensure that the student(s) did, in face, receive the access you specified. If you find that a student's displayed Special Access settings reverted back to the default after saving, you will need to click the pencil icon to return to that student's Special Access settings and set them again. The settings should save correctly the second time.