- Awards Tool
- Copying Content
- Syncing Gmail Calendar with eConestoga
- Syncing iCal with eConestoga
- Syncing Office365 Calendar with eConestoga
- eConestoga Community Shells
- Request Custom Shells
- End Dates & Controlling Course Visibility
- Enrollment & User Roles
- Keeping Your ePortfolio After You Graduate
- Grades Setup
- Merging Courses
- Publishing Your Grades
- Quiz Submission Views
- eConestoga Student Reference
- Special Access in eConestoga Quizzes
Our Guides Have Moved!
If you have bookmarks to our old guide site, please update them!
You can find this guide in its new location here:
Post Your Online Class
Post Your Online Class
If you are teaching online classes through Microsoft Teams, eConestoga can make your meeting information easy for students to find if you post it in the right spot.
Part 1 - Create a recurring meeting
Note: There are several different places within Teams where you can create a recurring meeting, and each uses a different interface. There is also a different interface between the Teams desktop app, the Teams mobile app, and the version of Teams that runs inside a web browser. They all work, but if you want to follow the workflow and screenshots detailed here, install the Teams desktop app and start on the Calendar tab.
- Open the Microsoft Teams desktop app. Click your face at the top right and make sure you are logged in with your Conestoga account. If you see a different account listed (either a personal account, or one for another employer or another educational institution), Sign Out, and then log back in with your Conestoga network username and password.
- Open the Calendar tab.
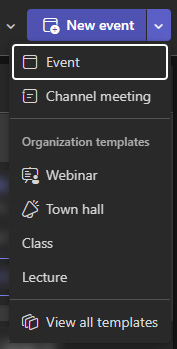
- At the top right, click the arrow beside the New event button. Choose "Event" as the meeting type if you want generic settings, or choose one of the other preset options such as "Class" or "Lecture" if you prefer those meeting types.
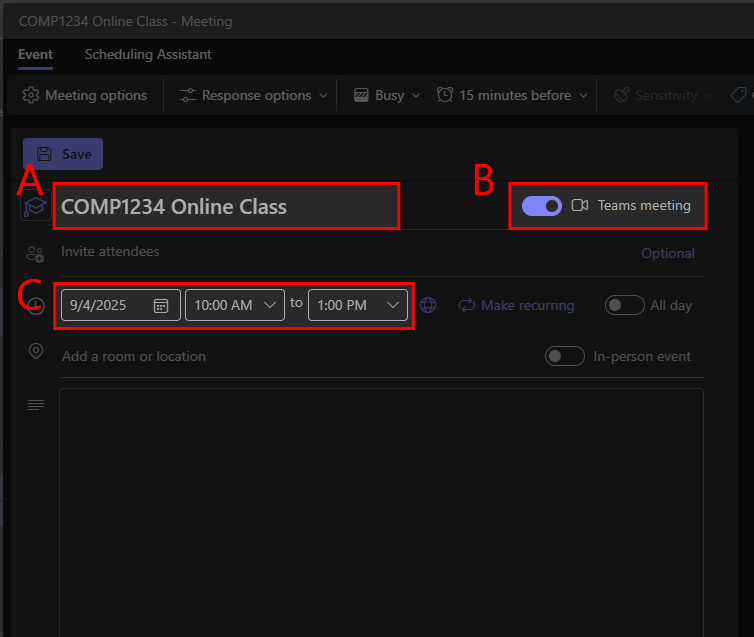
- A window will appear. Fill out the following:
- Enter a Title.
- Enable the "Teams Meeting" option.
- Set the date and time of the first meeting.
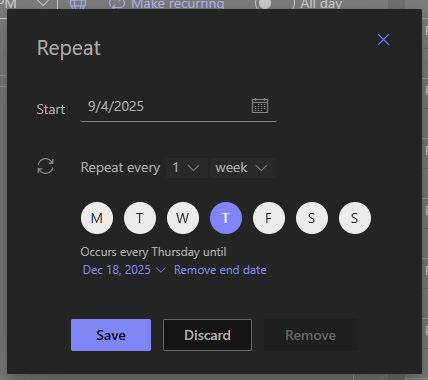
- Beside the date, click Make Recurring. In the window that appears, set the date of the last occurrence.
- You can set a Description and configure any other options you wish. When you're done, click Save at the top.
- You will be returned to your calendar. Locate one of the recurring meetings, and right-click on it. In the menu that appears, choose Copy meeting link.
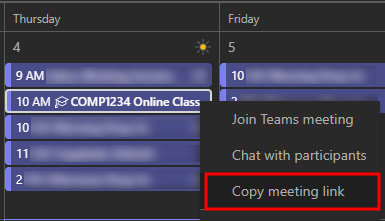
Once you have that link copied, you're finished in Teams and can now move to eConestoga for the next part of the setup.
Part 2 - Post your meeting link in eConestoga's Calendar
Note: This part will involve entering a lot of the same information we just entered into Teams. Teams now knows when the meeting is happening, but we need to tell eConestoga when it's happening-- the date information won't transfer automatically.
- Go to eConestoga, and open your course.
- At the top, click Course Tools -> Calendar.
- At the top left, click Create Event.
- Give the calendar event a Title. Something like "COMP1234 Section 3 Online Meeting", will make it clear to your students what the event is.
- In the Description block, paste the Invite Link we copied from Teams. (You can add other text as well if you want, as long as the meeting link is also there).
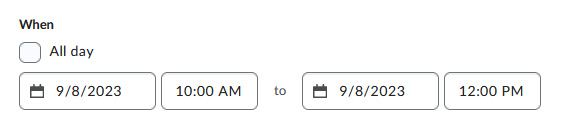
- Under the When settings,
- Set the date and time of the first class. eConestoga handles this differently than Teams did-- both of the Dates here are for the first class, and so should be the same date. We'll set the date of the last class later.
- Click Add Recurrence.
- Set it to recur Weekly, repeating every 1 week.
- Repeat On: check the day(s) of the week the class is held.
- Recurrence Ending: Set the date of the last class.
- When you're done, click Create at the bottom of the screen.
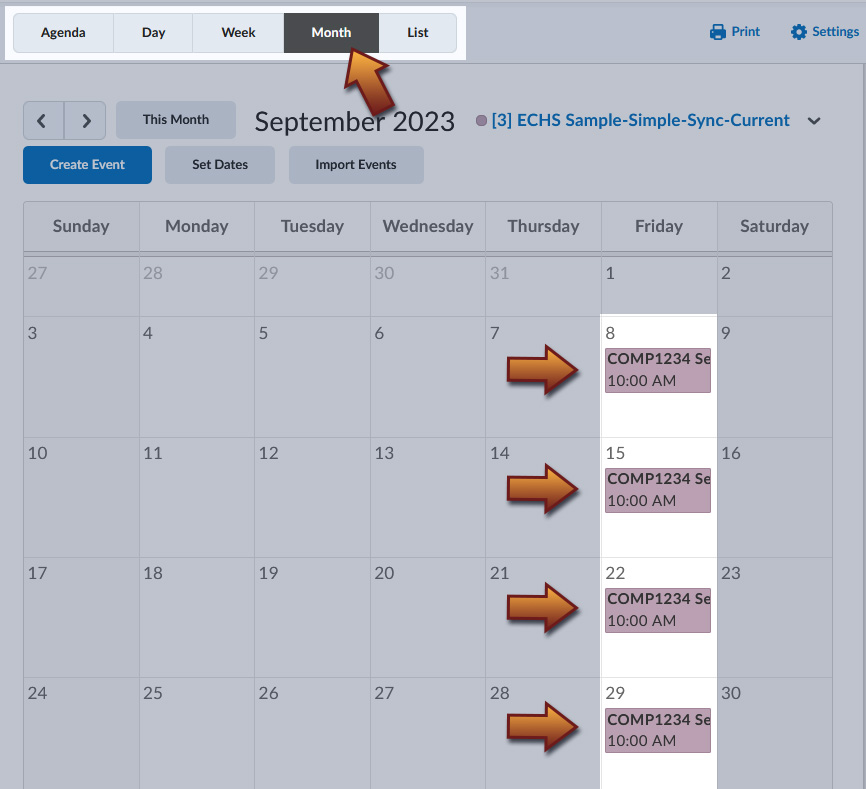
- Back on the Calendar view, click Month at the top if you aren't already looking at the whole Month view. If you set your meeting up correctly, you should see a calendar entry for every week of your class.
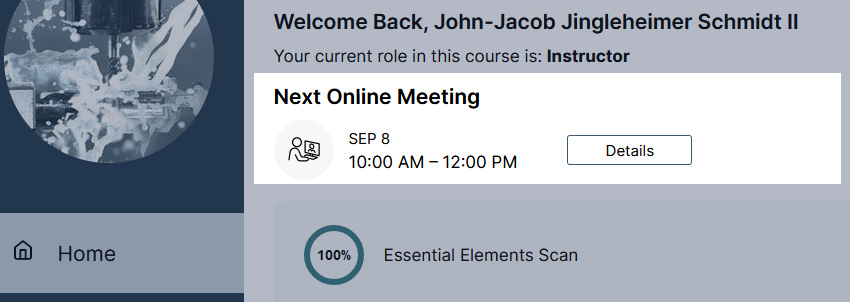
- Click your course title at the top of eConestoga to return to your course homepage. If you've done everything correctly, the homepage should list the "Next Online Meeting" for your class. A launch button for the meeting will appear in that space shortly before the class starts.