- Awards Tool
- Copying Content
- Syncing Gmail Calendar with eConestoga
- Syncing iCal with eConestoga
- Syncing Office365 Calendar with eConestoga
- eConestoga Community Shells
- Request Custom Shells
- End Dates & Controlling Course Visibility
- Enrollment & User Roles
- Keeping Your ePortfolio After You Graduate
- Grades Setup
- Merging Courses
- Publishing Your Grades
- Quiz Submission Views
- eConestoga Student Reference
- Special Access in eConestoga Quizzes
Our Guides Have Moved!
If you have bookmarks to our old guide site, please update them!
You can find this guide in its new location here:
Print a Quiz
Print a Quiz
The Print feature in eConestoga Quizzes can be used to produce printable exams, or to generate an answer key for the instructor.
Generate A Printable Quiz
- Go to Course Tools -> Quizzes.
- Click the drop-down arrow beside your quiz' title and choose Print.
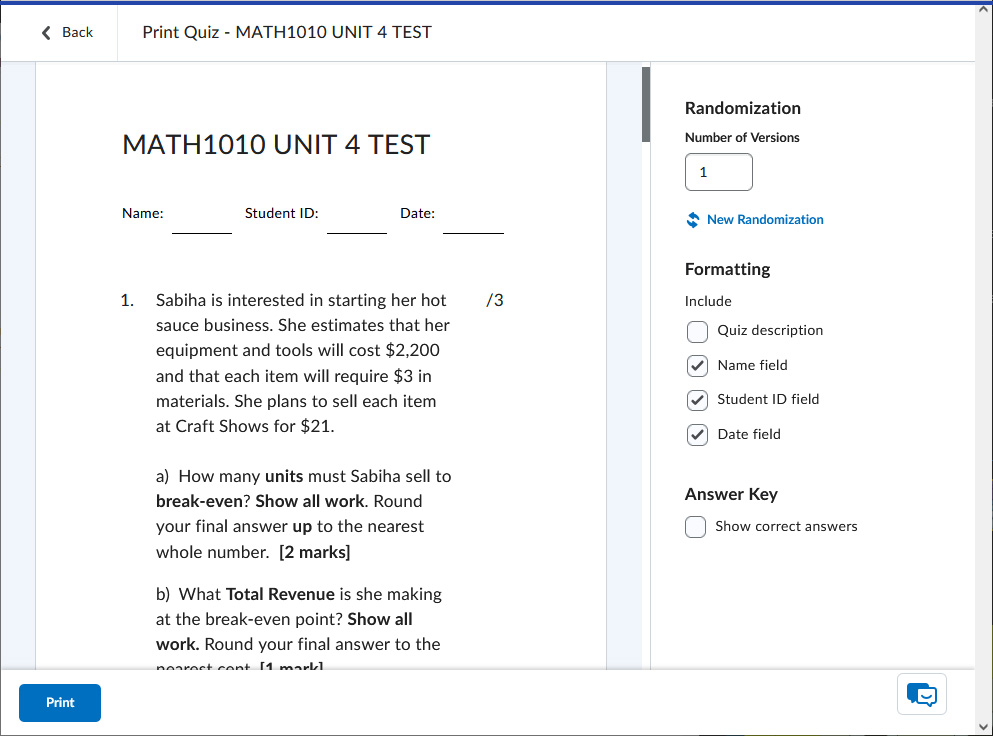
- You will be taken to a print preview screen with several options.
- Randomization: If your quiz contains random elements (Question Pools or Arithmetic questions), you can choose to create multiple versions of the quiz with different randomized contents in each one. If you select this option, the preview will have a number of tabs equal to the number of versions you selected, with a Print button at the bottom of each tab.
- Formatting: There are several optional elements that you can add to facilitate a paper quiz.
- Quiz description: If checked, the quiz' manually written description will be included at the top of the quiz.
- Name field: If checked, the student will be provided a blank space in which they can write their name.
- Student ID field: If checked, the student will be provided a blank space in which they can write their Student Number.
- Date field: If checked, the student will be provided a blank space in which they can write the date.
- Answer Key: Turns the printed output into an answer key. Don't select this when creating a quiz for a student to write!
- When you're satisfied with the previewed quiz, click the Print button at the bottom left. If you are attempting to create a PDF of the quiz, make sure you select a PDF printer instead of a normal paper printer.
Generate A Quiz Answer Key
The process to generate an answer key is the same as above, except that you will select the "Answer Key" option. This will cause the system to display the correct answer next to every question in the printed output, as well as the words "Answer Key" at the top of each page.
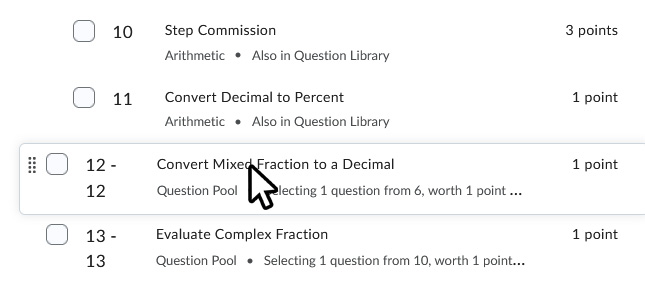
However, it's worth noting that the answer key may not include all of the quiz' questions by default. If your quiz uses Question Pools, where each student sees only a few questions chosen randomly out of a larger pool, then checking the Answer Key option only shows correct answers for the number of questions a student would normally receive-- it doesn't cause the output to also include all contents from all question pools.
If your quiz uses question pools, and you want to make an answer key that shows all questions from all pools, then you will need to temporarily modify your quiz to display that way.
- Go to Course Tools -> Quizzes.
- Click the drop-down arrow beside the name of the quiz and choose Edit.
- Scroll down to the list of the questions. For each question pool,
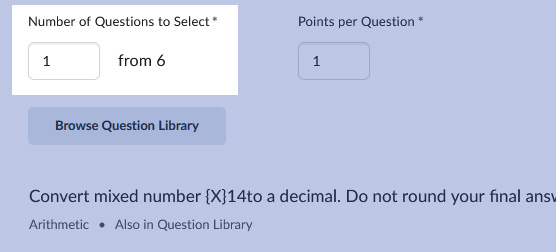
- Click on the name of the question pool to edit it.
- Note down how many questions it is currently set to display. You will be changing the number temporarily, so it's important that you know what number to change it back to later!
- Change the number of questions to display so that it shows all questions in the pool. E.g., if your pool currently shows 10 out of 20 questions, change it to 20 out of 20.
- Click Save and Close at the bottom.
- Repeat these steps for each other question pool.
- Click Save and Close at the bottom left of the quiz editing screen.
- Click the arrow beside the name of the quiz, and then choose Print. Select the Answer Key option, and print the quiz.
- Repeat steps 1 through 3 above, but set each pool back to the number of questions it was originally set to display.