- Awards Tool
- Copying Content
- Syncing Gmail Calendar with eConestoga
- Syncing iCal with eConestoga
- Syncing Office365 Calendar with eConestoga
- eConestoga Community Shells
- Request Custom Shells
- End Dates & Controlling Course Visibility
- Enrollment & User Roles
- Keeping Your ePortfolio After You Graduate
- Grades Setup
- Merging Courses
- Publishing Your Grades
- Quiz Submission Views
- eConestoga Student Reference
- Special Access in eConestoga Quizzes
Our Guides Have Moved!
If you have bookmarks to our old guide site, please update them!
You can find this guide in its new location here:
Create a Quiz - Assemble Your Quiz
Create a Quiz - Assemble Your Quiz
Assemble a new Quiz
Now that you've built your questions in the Question Library, we can add them to a new Quiz. For our first quiz, we'll add a specific set of questions to the quiz that all students will receive.
- Go to Course Tools -> Quizzes.
- Click New Quiz at the top of the screen.
- Give the Quiz a Name. Skip all of the other settings for now. We'll come back to them later in Step 4.
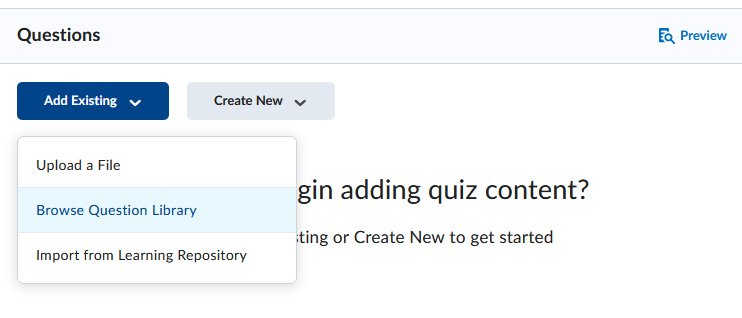
- There are two buttons inder the "Questions" heading-- "Add Existing", and "Create New". Our questions already exist in the Library, so click Add Existing -> Browse Question Library.
- A panel will appear with a view of your Question Library. Locate the Section of your library where the questions for this quiz are located.
- If you wish to import the entire section of questions, check the box beside the section title.
- If you only wish to import some of the questions, click the arrow beside the section title to expand it, and then check the boxes beside any questions you want to import.
- Once you've selected the questions you wish to include, click Import at the bottom of the panel.
- If you've added a question by mistake that you wish to remove, check the box beside that question. A small panel will appear above the question list. Click Delete in this panel to remove the questions from your quiz. Note that this does NOT delete the question from your Question Library.
- Once you're satisfied with the list of questions, click Save and Close at the bottom left of the screen.


The last step is to configure the various settings for your quiz.