- Awards Tool
- Copying Content
- Syncing Gmail Calendar with eConestoga
- Syncing iCal with eConestoga
- Syncing Office365 Calendar with eConestoga
- eConestoga Community Shells
- Request Custom Shells
- End Dates & Controlling Course Visibility
- Enrollment & User Roles
- Keeping Your ePortfolio After You Graduate
- Grades Setup
- Merging Courses
- Publishing Your Grades
- Quiz Submission Views
- eConestoga Student Reference
- Special Access in eConestoga Quizzes
Our Guides Have Moved!
If you have bookmarks to our old guide site, please update them!
You can find this guide in its new location here:
Create a Quiz - Quiz Settings
Create a Quiz - Quiz Settings
Configure Your Quiz
Your Quiz should now be set up with all questions that your students will be required to complete. The last step of the setup process is to configure a number of instructional, timing, and security settings so that the quiz behaves as you intend.
Timing & Visibility Settings
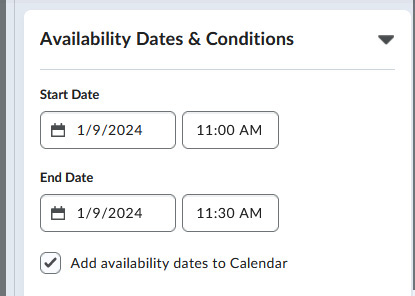
The most important settings to always remember to set are your quiz' timing settings. First, set the Start and End Dates:
- Open the Availability Dates & Conditions block on the right side of the screen.
- Click on the Start Date field, and use the calendar to choose the day that students can begin the quiz. Next to the date, set the time that the quiz opens.
- Do the same for the End Date.
- Check the box beside "Add availability dates to Calendar"
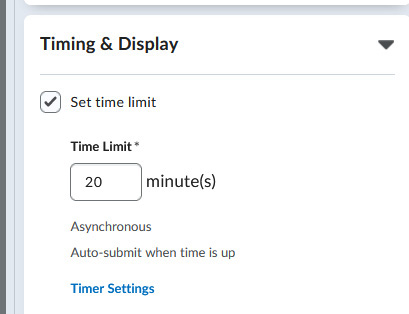
Next, set the Time Limit for the quiz:
- Open the Timing & Display block on the right side of the screen.
- Check the box beside "Set time limit".
- Enter the Time Limit in minutes.
Once you've set the Start and End Date, it should be safe for you to click the Visible toggle at the bottom to make the quiz visible, and then click the Save button. Students will now be able to see that the quiz exists, but will not be able to open it until the Start Date you set.
This is the simplest way to set quiz timing. For more advanced timing options, please refer to our guide to quiz timing.
Special Access
If any of your students have an accessibility accommodation which allows them extra time to write quizzes, you can use the Special Access menu to give those specific students a different writing window or time limit. Detailed instructions can be found in Special Access in eConestoga Assessments.
Display Options
There are additional settings that you can apply which control how the quiz appears to your students.
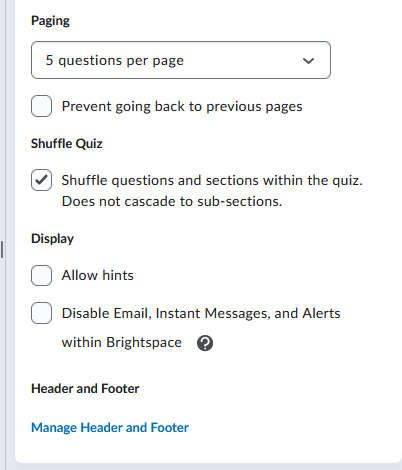
- Open the Timing & Display block on the right side of the screen.
- Under the Paging option, set how many questions should display on one page. If you aren't sure what to set, 5 questions per page tends to work well for most quizzes.
- If you want, you can set the Prevent going back to previous pages option to make it harder for students to collaborate on the quiz.
- The Manage Header and Footer options are available to let you provide students a text block at the top and/or bottom of every page while writing the quiz. This is entirely optional, but some examples that instructors occasionally place in the Header or Footer include:
- Formula lists or other officially-sanctioned "cheat sheets".
- Links to websites or documents that students can refer to during the quiz.
- Note: If your quiz will use Respondus LockDown Browser, there are additional steps required to make a link to an external website or document work correctly inside Respondus. Contact eConestoga Support for more information if you need to do this.
- Tech support information for students who have problems while writing their quiz.
- Etc.
- When you're finished, click the grey Save button at the bottom of the screen.
Connection to Grades
If you are building a graded quiz, you will need to connect it to a Grade Item. Note that these steps assume that your course's grades have already been set up. If they haven't, do that first, then come back and connect the quiz to a grade item.
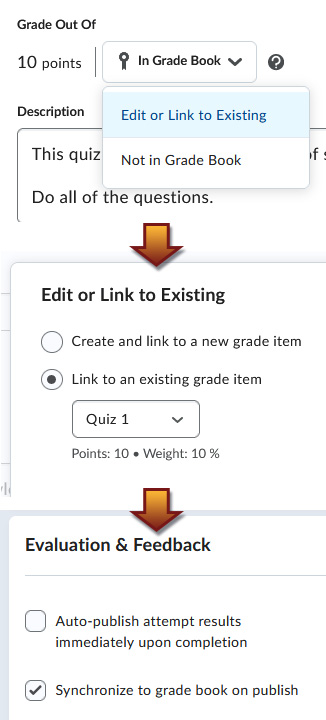
- On the left side of the Edit Quiz screen, beside the total points for the quiz, click Not In Gradebook. In the menu that opens, choose Edit or Link to Existing.
- Very important and often missed:On the next screen, choose the second option, Link to an existing grade item. If you leave the default option-- "Create and link to a new grade item"-- selected, you will create duplicate grade items and break your grades calculation.
- Choose the grade item you want to connect to, and then click Ok at the bottom.
- Back on the main Edit Quiz screen, open the Evaluation & Feedback block on the right side.
- The first option, Auto-publish, should be selected if your quiz is entirely built from self-grading question types (e.g., Multiple Choice, True/False, etc.). If you have any written questions that require manual grading, uncheck the first option.
- The second option, Synchronize to grade book, should always be checked.
- When you're finished, click Save at the bottom left.
When you're finished, click Save and Close at the bottom left.
Previewing your Quiz
And that's it! If you followed all of these steps, you should now have a quiz that contains all of the questions you created, which will be delivered at the time you specified, using the settings you selected.
If you'd like to see what the quiz you've built looks like for your students:
- Go to Course Tools > Quizzes.
- Click the drop-down arrow beside the title of the Quiz and choose Preview.